Desert photography is one of the beautiful and provocative genres of photography where the basic theme is the large and barren areas characteristic of high desert country. Photographers can capture the events that these terrains convey, as well as the various unfair textures and light intensities in the high desert. A photographer’s paradise, high desert photography features everything from golden early-morning dunes to starry, nighttime granite cliffs.
However to become proficient at it, one must learn to anticipate how the light will travel and how these dynamic landscapes’ patterns of shade and shadow will change.
[ez-toc]
A beginner’s guide to photographing the desert
Shooting in the desert can be quite interesting and tiring at the same time, this is because it presents different and new kinds of subjects to shoot and the extreme weather in those areas due to the type of climatic conditions present tends to be very extreme. High desert photography, for instance, contains a rather unique combination of desert views and opportunities for vast wide shots.
Here are some tips for beginners venturing into high desert photography.
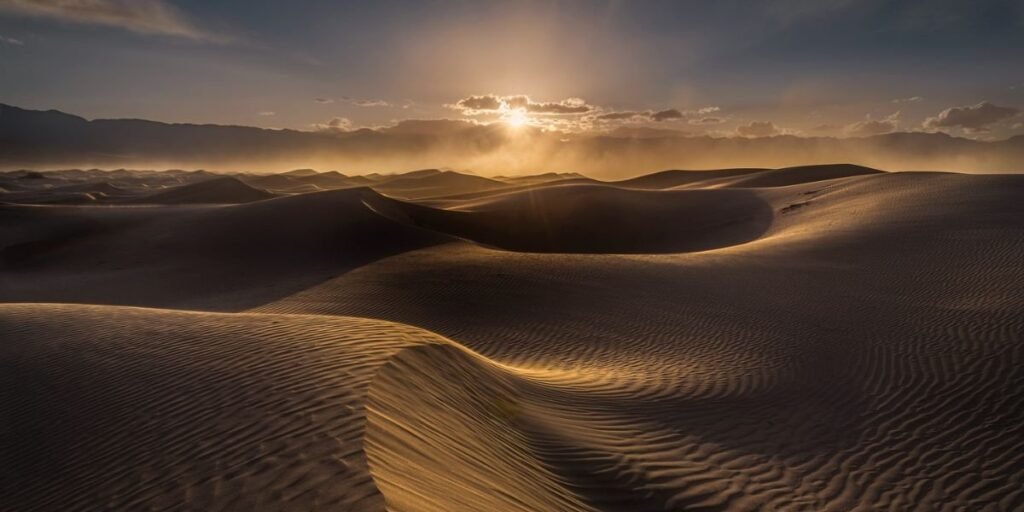
Golden Hours: Photograph early in the morning and late in the afternoon when the light is not too harsh and the shadow of the object is long. This will add a dimension of roughness to your desert images which is even more appealing.
Gear Protection: Like any other type of climate, they can be unforgiving, especially to most forms of life. Carefully transport your camera gear by ensuring adequate cases/covers to reduce the possibility of coming across dust/sand.
Composition: Take advantage of the large planes, and the natural rhythms that can often be had, such as dunes or a rock face. Both, leading lines and the rule of thirds are effective in the shooting of desert photography.
Settings: Don’t forget to set your camera for the dry, bright conditions of the desert environments. A low ISO of a camera is less noisy and hence should be used, while a small aperture ensures more objects within a scene are in focus.
Stay Hydrated: Make sure to always have enough water with you and drink quite a lot when shooting in the hot environment of the high desert.
With these tips in mind, one will be in a good position to take great shots and convey the wilderness and emptiness of the desert.
Best Time for High Desert Photography
High desert photography also presents rather interesting possibilities for creating beautiful photographs. It is most advisable to take high desert photography during the early morning hours or late in the evening. It is at such times that light is less harsh, and shadows are longer; this provides blacks and contrasts and other bright colors that set out the rough uniqueness of the deserts.
Sometimes it’s even possible to plan extended shooting, since early morning is usually free from clouds and by the same time it is comparatively cool. Also, the hour immediately after the sunset changes the view of the highly elevated desert from a dull-colored desert into an artistically colorful and serene sight.
Essential Gear for High Desert Shots
If you are planning on capturing photos in a high desert, then you cannot forget about a tripod since the environment often presents incidences of wind gusts. The main features that are important in this situation are the dynamic range of the camera to take clear shots of the bright sky and black rocks in the same frame. Bring a variety of lenses: a lens for the broad sceneries, and one for the up-close objects of interest.
A polarizing filter assists in the reduction of glare and at the same time intensification of colors. Do not forget additional batteries and memory cards, as the camps are situated off the beaten track and may not have electricity. Lens hoods and dust covers for your equipment, that is important to prevent sand and direct sunlight from affecting your camera.
Mastering Natural Light in Deserts
Natural lighting in the desert needs to have a certain set of characteristics and must be mastered for the construction of buildings in the desert. The amount of light received during the day and the purity of the air due to the lack of humidity results in finer shades and high contrasts as seen in high-contrast photography. Nevertheless, early light in the morning often referred to as the golden hour, and late light in the afternoon also referred to as the golden hour provide good textures and good shapes because the shadows are longer.
Midday light is quite severe but can be managed through the use of diffusers or reflectors on the subjects to minimize the shadows or enhance the highlights. Other objects that can be incorporated into this technique are sand inclines, stones, and sparse undergrowth as these can assist in creating depth and curiosity. It’s important to wait for the right moment and try different approaches to capture the essence and the charm of the desert.
Capturing Stunning Desert Landscapes
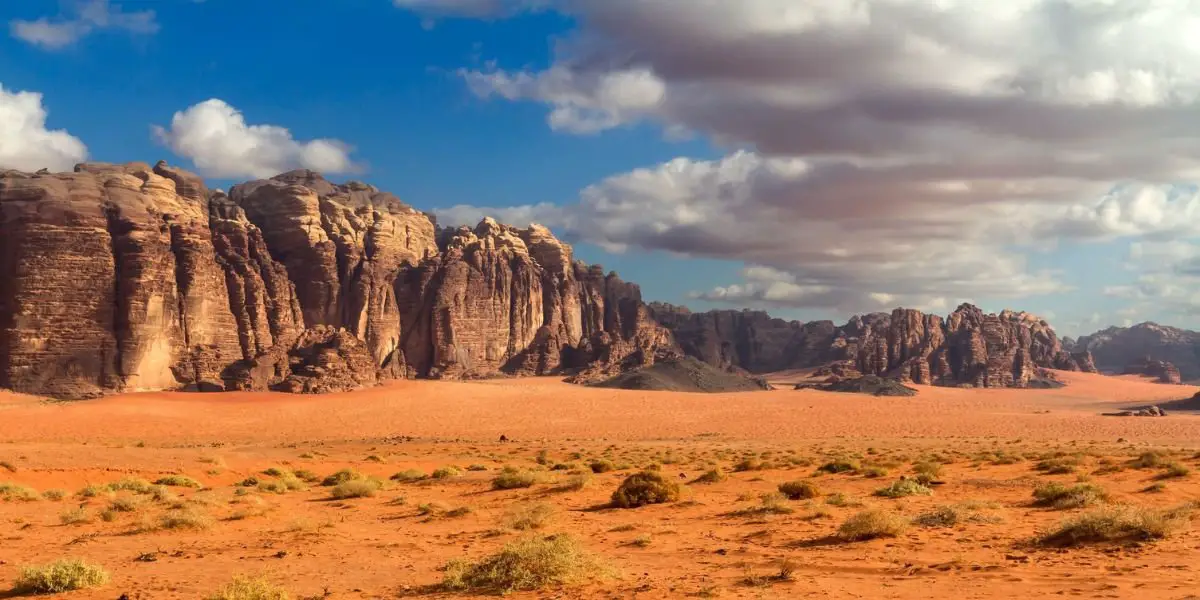
Capturing images of the deserts requires a sense of timing, style, and vision that is frequently hard to define. It is advised to go during the golden hours to experience the sun’s gentle, warm tones. To capture the expansiveness of the location, use a tripod and try to use a broad-angle lens. Their search should focus on finding specific items, such as desert-specific plants, boulders, and dunes.
As a result, the piece will feel more dramatic when leading lines and shadows are used. Patience and inventiveness are what transform the barren into the genuinely lovely.
High Desert Photography Composition Tips
There are rules that one has to adhere to while undertaking photography especially when in the High Desert region. Too, contrary to what the title might suggest, take advantage of the golden hour to get the best out of the light on the rocks and their shadows. Integrate the leading lines from the desert trail to help guide the viewer’s eye. Add an element in the foreground, such as cacti or stones, to create some depth.
Be BIG with the sky and GROUNDED with the land. Try to turn the scene in different directions and make sure you get its vast and calm nature perfectly.
Choosing the Right Lenses for Desert Photography
Desert photography requires a selective choice of lenses because of the broad spaces and the special kind of lighting. Zoom lenses capture a more general area of view and are useful for large spaces and people (14-24mm) while telephoto lenses capture specific details and wildlife (70-200mm). A polarizing filter helps to bring out colors to the maximum and diminish glare. Therefore, it is advisable to look for lenses with a good rating as to dust since dust is prevalent in the desert. Wide angle lenses (24mm) can generally also be used for a variety of compositions and zoom lenses are also suitable for varying compositions such as the 24-70mm.
High Desert Photography Camera Settings
When using the camera for high desert photography, ensure that you are in manual mode. Set your ISO to a low number (100-200) that will keep noise to a minimum; utilize a small aperture (f/11-16) to make more of the scene in focus and use a shutter speed that corresponds with the available light; the range is 1/100s to 1/250s when the light is bright. You might also want to think about using a polarizing filter to minimize the glare along with improving the colors. A tripod should be used but for stability especially when shooting under low light or at dawn. Try using different effective white balance settings for the best results.
Finding Unique Angles in the Desert
Shooting with different perspectives in high desert photography is the key to looking for different perspectives to make the beauty of The barren landscape. Be ready for the contrasts between the light and the shadow, the vast territories of sand, and the intricate visions of vegetation. Try changing the time of day to capture dramatic effects that you can only get in desert photography.
Using Shadows in High Desert Photography
In high desert photography, the subject and its shadows become critical in developing a proper layering effect in the picture taken. The type of light in these areas is direct, intense, and very strong; the shadows have high contrast and they enhance the forms and details of the objects.
These shadows can be quite effective for photographers wanting to create that drama and depth where the desert terrain comes to life. Timing is very important; one should take pictures during the golden triangle; this is when the light is perfect.
Post-Processing Tips for Desert Photos
Improve the quality of desert pictures by exaggerating the background. Regulate the lighting to have the extreme sunny areas and the areas of shade. Increase contrast to enhance the visibility of the sand and the rocks’ surface. Brighten it somewhat more to get punched by the otherwise flattish colors, especially during golden hour. To make emphasis on fine details, apply clear and perpendicular angles.
It is preferred to specify a warm leaning to the color temperature to make the atmosphere as welcoming as possible. Finally, remove any elements that are unnecessary and crop the image for better composition.
High Desert Photography: Avoid 3 Common Mistakes
Photography in the high desert is not an easy task, but it also has a lot of prospects. To help you capture the best possible images, here are three common mistakes to avoid
1. Ignoring the Harsh Lighting
Mistake: High desert regions are extremely sunny which results in images that are overexposed and shadows.
Solution:
- Shoot During Golden Hours: Ideally better to photograph in the early morning / late afternoon when the light is not as harsh.
- Use Polarizing Filters: These filters are capable of eliminating glare and at the same time improving the colors.
- Seek Shade: It is preferable in the latter to shoot in shaded places or make shade where it is impossible to shoot.
2. Overlooking Composition
Mistake: As you can see, the sand and extensions of the deserts can make the photographs uninteresting or lack an area of interest or some sort of framing.
Solution:
- Rule of Thirds: Position important parts of the material either on the particular lines or at the crossing points.
- Include Foreground Interest: Create germination by adding rocks, plants, or other objects with your pictures to produce a sense of depth.
- Lead the Eye: Indirectly lead the viewer’s eye through the photo by having a natural line such as a trail or edge of a dune.
3. Neglecting the Environment
Mistake: Lack of adequate preparation results in equipment and, at least, personal discomfort due to the severe and changing weather of the high desert.
Solution:
- Protect Your Gear: In light of this, employ lens hoods and covers to avoid falling victim to lenses to sand or dust.
- Stay Hydrated and Safe: Eight tips for surviving hot weather are taking water, dressing properly, and letting someone know you are off.
- Be Mindful of Wildlife: If you encounter any animals and plants, always consider them important and give them a wide berth to ensure they are not interfered with.
This way, by avoiding those common pitfalls you will be better equipped to capture and depict the true essence of the high desert. Happy shooting!
Read More…
Top-5-beginners-tips-for-taking-great-pictures
Conclusion
Photography of a high desert is one of the most challenging, creative, and insightful tasks in photographing a geographical feature as it requires a proper understanding and planning. When using the tips outlined above, you shall be in a good position to survive the worse conditions, master the light, and have the ability to compose better photos. Savor the difficulties of high desert photography as a match for some experimentation to bring out the best in you, it’s going to be one of the most profitable and spectacular photographic experiences